 English
 Indonesian
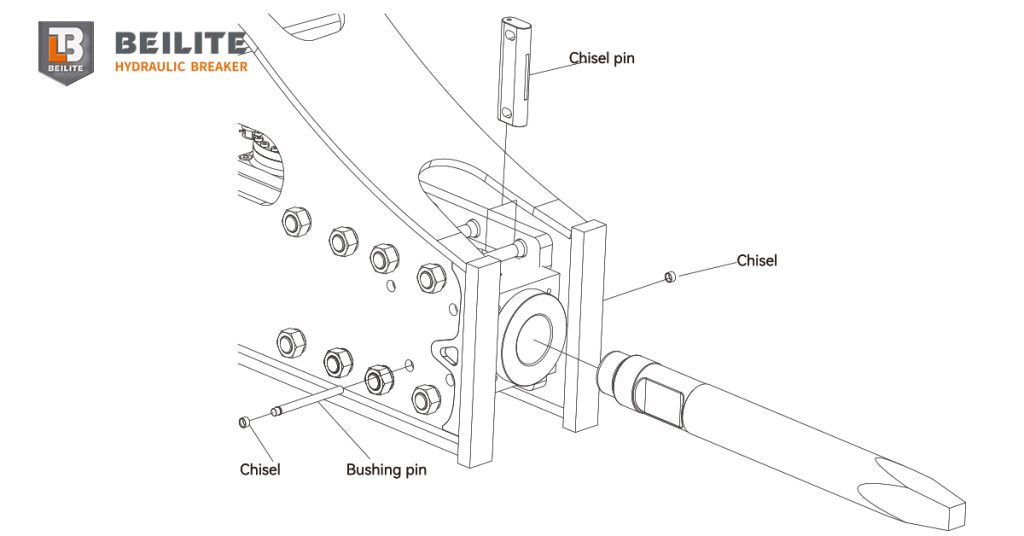
Installing and uninstalling hydraulic breaker chisels are a routine yet critical task for excavators and loaders operators. Whether you are working with hard rock, concrete demolition, quarrying, or mining applications, proper chisels handling ensures maximum impact power, longer breakers life, and safer operations. For owners of Beilite hydraulic breakers, following the correct procedures also protects your machine from premature wear, blank firing, and internal damage.
This guide explains step-by-step how operators should install and uninstall hydraulic breaker chisels, while maintaining safety and optimizing performance. It also covers essential adjustments such as relief valve settings, anti-blank fire functions, and impact-rate control.
Essential Chisel Safety Tips: Prevent Injuries & Damage
The chisel (also commonly known as the moil, tool, or bit) is the core working component of a hydraulic rock breaker. When not installed correctly, operators may face issues such as:
- Reduced impact energy
- Overheating of the chisel
- Excessive wear of chisel pins and bushings
- Blank firing, which may crack the front head
- Loss of hydraulic pressure or unexpected breaker stoppage
Beilite hydraulic breakers are designed for heavy-duty demolition, but proper chisel installation will removal ensure you get their full performance and longevity.
How to Uninstall a Hydraulic Breaker Chisel?
The chisel can become extremely hot after operation. Operators must allow cooling time and wear heat-resistant gloves before removal.
Step-by-Step Chisel Uninstallation
1. Check the bushing pin: Inspect both ends of the bushing pin. Using a mandrill, knock the bushing pin out from the small-diameter side toward the large-diameter side.
2. Remove the chisels: Take the chisels out of the front head carefully.
3. Inspect components: Check the contact surfaces between the chisel pin, the chisel itself, and the thrust bush inside the front head.
- If wear exceeds the limit, replace the parts before reinstallation.
- Proper upkeep prevents abnormal vibrations and front head cracking.
Removing the chisel safely helps maintain the breaker’s internal alignment and prevents costly repairs.
Correct Installation of Chisel Begins with Proper Hydraulic Settings
Before installing a new chisel or reinstalling the existing one, operators must verify that the breaker’s hydraulic system is set correctly.
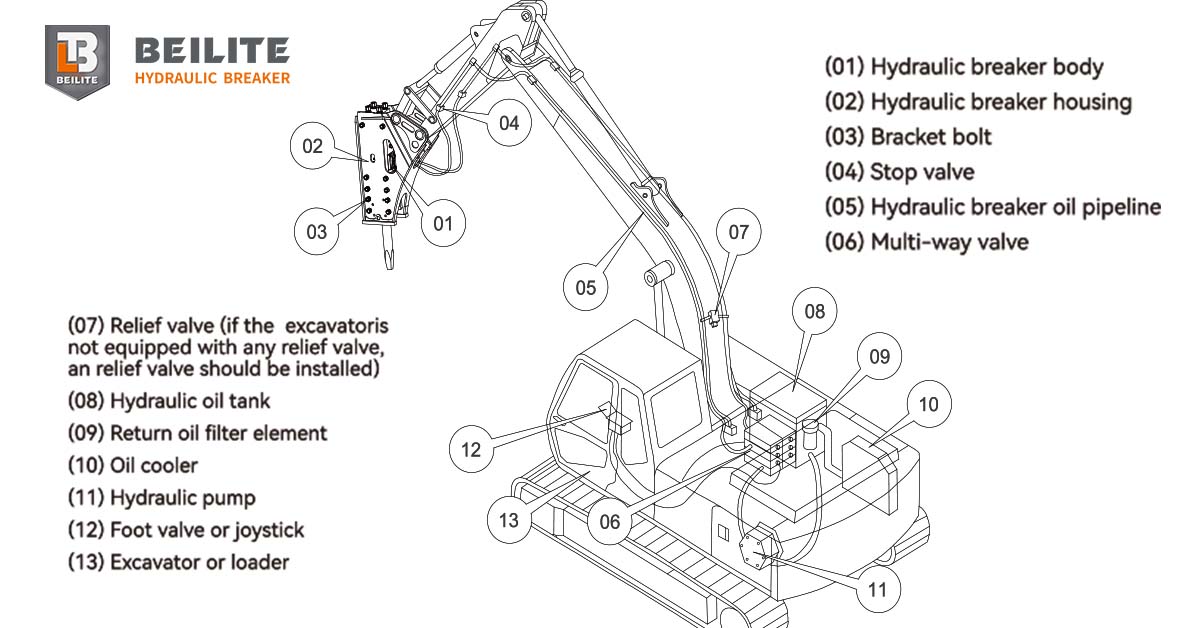
Setting the Relief Valve Pressure
The relief valve ensures the hydraulic breaker operates within the manufacturer’s recommended pressure range.
The relief valve is typically located on the excavator’s boom-side hydraulic breaker pipeline.
If the pressure is too low, the breaker will have weak strikes or may fail to start.
If the pressure is too high, surrounding components such as hoses, pipes, pumps, and valves may suffer damage.
Correct setting:
Maximum working pressure of the hydraulic breaker + 30–40 bar.
1. How to Adjust the Relief Valve
2. Close the stop valves of the inlet and return pipelines.
3. Connect the measuring equipment to the inlet and outlet ports.
4. Open the stop valve and activate breaker mode.
5. Adjust the relief valve knob until the correct pressure is reached.
If your excavator already displays pressure on its instrument panel, manual testing may not be necessary.
Adjusting the Valve Adjuster (BLTB125 and above)
Beilite hydraulic breakers include a control valve adjuster, allowing operators to customize:
- Working pressure
- Impact power
- Impact frequency
Control Logic
Close (clockwise)
- Increases working pressure
- Increases impact power
- Reduces impact frequency
Open (counterclockwise)
- Decreases working pressure
- Decreases impact power
- Increases impact frequency
Adjustment Procedure
1. Stop the excavator or loader and place the breaker on flat ground.
2. Loosen the nut until the valve rotates freely.
3. Adjust clockwise or counterclockwise based on material hardness.
4. Hold the valve with an L-wrench while tightening the nut.
5. Factory setting: Fully closed, then loosened 2.5–3 turns.
Anti-Blank Fire (ABF) Operation (BLTB175L Model)
Blank firing is one of the most damaging events for a hydraulic breaker. It occurs when the piston strikes without resistance, sending shock loads into the chisel pins, bushing pins, and front head.
Beilite’s Automatic Anti-Blank Fire Feature
- Automatically stops working when blank fire occurs
- Resumes striking when the chisel contacts the material again
- Protects the front head, piston, and all internal components
- Greatly extends breaker lifespan
When to Use ABF
- Turn ON: Hard rock, reinforced concrete, heavy-duty demolition
- Turn OFF: Soft rock, secondary breaking, brittle materials
How to Activate/Deactivate Hydraulic Breaker’s ABF?
1. Place the breaker upward on firm ground.
2. Release hydraulic pressure.
3. Close stop valve.
4. Remove ABF valve plug.
5. Remove valve.
6. Turn thread end outward (ON) or inward (OFF).
7. Reinstall all parts and check O-rings.
ABF is ON by default from the factory.
Side Adjuster Valve (BLTB135/150 Hydraulic Breaker Model)
This valve allows the operator to change the blows per minute (BPM) for different materials
Clockwise (Closed)
- Longer piston stroke
- Stronger impact power
- Lower BPM
- Best for large and hard rocks
Counterclockwise (Open)
- Shorter stroke
- Lower impact power
- Higher BPM
- Ideal for soft materials, brick walls, low-hardness rock
- Final Inspection After Installation
Once the chisel and hydraulic settings are in place:
Check working pressure using a gauge or the excavator panel.
- Measure pre-installed gas pressure in the back head and accumulator.
- Ensure no abnormal pipe shaking or leaks.
- Verify that impact frequency matches the model specification.
Proper installation guarantees strong, stable, and efficient operation.
Summary
Installing and uninstalling hydraulic breaker chisels is more than just removing a pin. Pin it is a combination of mechanical precision, hydraulic setting adjustments, and safety awareness. Beilite hydraulic breakers are built for durability, but their performance depends heavily on correct operator handling.
By following the procedures above, operators can:
✔ Extend breaker lifespan
✔ Prevent blank firing and internal damage
✔ Maintain consistent impact power
✔ Improve overall demolition efficiency
For further assistance, Beilite provides technical support, detailed manuals, and authorized service agents worldwide.
FAQs
1. How long does it take to install a Beilite hydraulic breaker on an excavator or loader?
Installation time varies depending on operator experience and machine type, but generally it takes 30–60 minutes. This includes positioning the hydraulic breaker, aligning the pin holes, inserting the connecting pins, securing the retainer rings, and performing a safety check.
2. Do I need special tools to install the hydraulic breaker?
No special tools are required beyond what is commonly included in a standard machine maintenance kit. Typically, you will need hex socket wrenches, bolts, nuts, and sometimes a lifting device to help raise the breaker safely.
3. How do I know if the connecting pins are properly installed?
Once inserted, the pins should move smoothly without resistance. Make sure the pin holes of the connecting rod and breaker housing are fully aligned before tightening. After installation, inspect for looseness, clamping, or abnormal friction during operation.
4. Is it necessary to apply grease or lubrication during installation?
Yes. It is recommended to apply grease to the pin sleeves, connecting pins, and bushings to reduce wear and ensure smooth movement. Proper lubrication also increases the breaker’s service life and reduces maintenance frequency.
Beilite Machinery Co., Ltd.
40008-40008
info@beilite.com
+6282321982255