 English
 Indonesian
Installing a hydraulic breaker may look straightforward, but doing it correctly is essential for safety, efficiency, and the long-term health of both your excavator and the hydraulic breaker itself. Whether you are preparing a brand-new Beilite hydraulic breaker or reconnecting one after maintenance, following a precise and clean installation process will make a real difference in performance.
In this guide, we will detail through a clear friendly explanation of how to install a Beilite hydraulic breaker on an excavator or loader step by step, with emphasis on safety, proper hydraulic pipe connection, and system cleanliness.
Why Proper Installation of Beilite Hydraulic Breaker is Matters?
A hydraulic breaker or rock breaker is a powerful tool, but it’s also a sensitive one. Its performance relies heavily on the condition and setup of your machine’s hydraulic system. The contamination, pressure mismatch, or incorrect pipe routing can lead to premature wear, abnormal vibrations, loss of power, or even serious damage.
By following the correct installation steps, operators or buyer protect both the hydraulic breaker and the base machine while ensuring strong, stable working performance.
Step 1: Prepare a Clean Hydraulic System
Before you even touch the breaker, turn your attention to the excavator. A clean hydraulic system is the foundation of a healthy breaker.
Here’s what you need to check:
✔ Inspect Hydraulic Breaker Oil Contamination
Hydraulic oil quality is critical. If the oil is dirty, milky, or contains metal particles, replace it or filter it thoroughly. Neglecting this step can push contaminants directly into the breaker, causing seal failures and internal wear.
✔ Replace the Hydraulic Breaker Return Oil Filter
Follow the excavator manufacturer’s maintenance schedule. A clogged return filter restricts flow and increases heat, which can damage the breaker.
✔ Clean the Hydraulic Breaker’s Hydraulic Hose Circuit (First-Time Use)
When installing a Hydraulic Breaker for the first time, run a circulating filtration cycle without connecting the breaker. This flushes out dust, welding debris, and other impurities left inside new pipelines.
These steps alone prevent many early-life failures.
Step 2: Verify the Relief Valve Pressure of Your Hydraulic Breaker
Hydraulic breakers require the correct pressure to operate safely. A pressure that’s too low reduces impact power, while pressure that’s too high can damage seals and internal components.
Beilite Hydraulic Breakers Recommended:
Set the hydraulic breaker’s relief valve 30 – 40 bar higher than the breaker’s normal working pressure.
If you’re unsure of your model’s working pressure, check the Beilite manual or your dealer. Setting the relief valve accurately ensures stable, consistent breaking force and protects the excavator’s hydraulic pump.
Step 3: Release System Pressure Completely
Before touching any hydraulic pipes:
Fully release the pressure in the hydraulic system.
This is not optional, it’s a safety requirement. Hydraulic pressure can remain stored even after the machine shuts down. Always release pressure using the excavator’s recommended method (usually moving the control levers after power-off).
This step prevents accidental oil bursts, pinching injuries, or pipe whip.
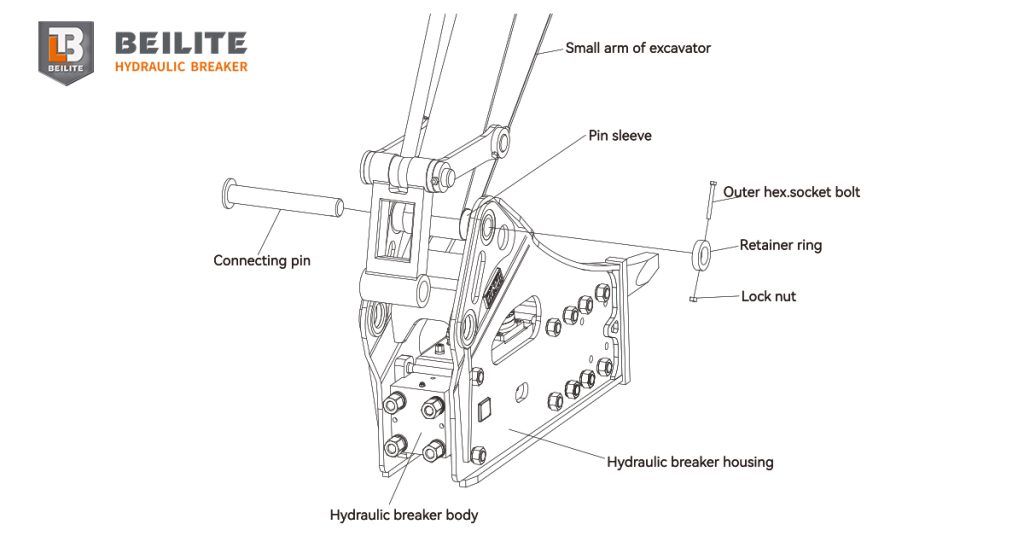
Step 4: Check All Hydraulic Breaker Connection Points
Before installation, inspect:
- Sealing surfaces
- Oil pipes
- Threaded connections
- Joint faces
These areas must not be damaged or contaminated by dirt, sand, or metal particles. Even a small grain of sand can cause leaks or damage O-rings once the system is pressurized.
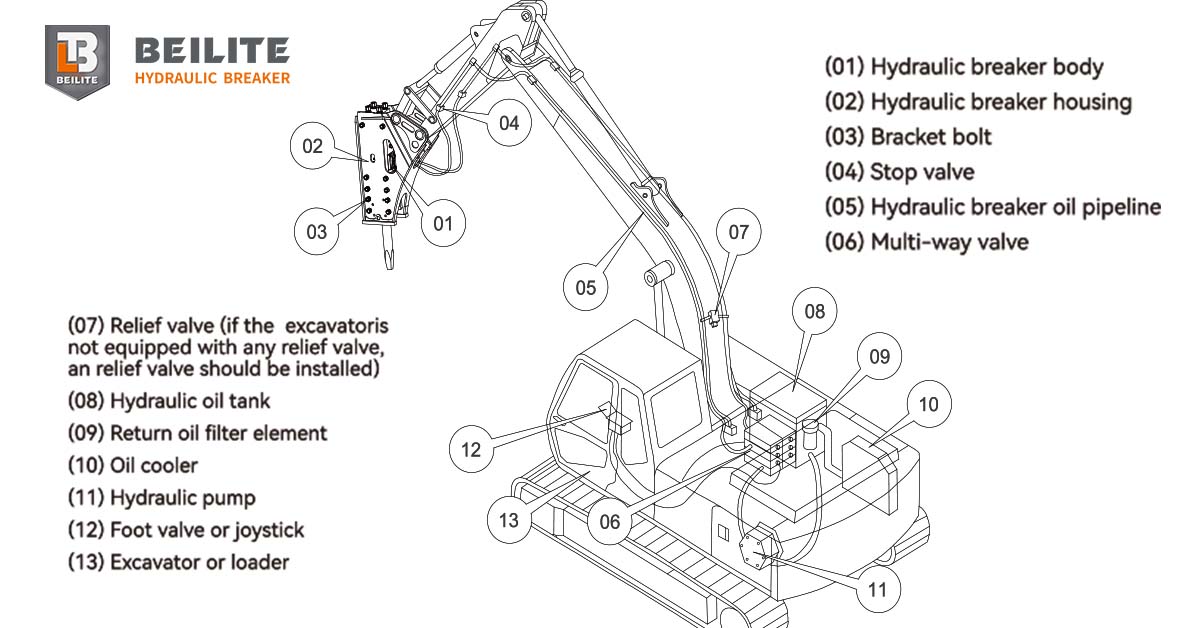
Step 5: Connect the Hydraulic Pipes
Now, you are ready to connect the hydraulic breaker.
1. Make sure the stop valve is fully CLOSED
This prevents sudden startup when pipes are pressurized.
2. Remove the IN/OUT adapter covers from the breaker body
You will see clearly marked ports:
- IN = oil inlet
- OUT = oil return
3. Connect the inlet and outlet hoses
This part is absolutely crucial:
- Do not reverse the IN and OUT hoses.
- Ensure hoses are not twisted, stretched, or rubbing against the boom.
- Maintain a smooth, natural hose curve to avoid internal flow resistance or hose fatigue.
4. Connect hoses to the stop valve
Again, double-check the direction of flow.
5. Open the stop valve carefully
Once opened, the hydraulic breaker may activate abruptly, so:
- Stand at a safe distance from the chisel.
- Never place hands, feet, or tools near the breaker tip during activation.
Step 6: Perform a Slow-Start Test
Before beginning real work, operate the breaker slowly. Activate it briefly several times and observe:
- Any oil leakage along hoses or fittings
- Hose deformation or vibration
- Abnormal noise
- Sudden pressure spikes
A smooth slow-start confirms that the hoses are secure, pressure is stable, and the breaker is receiving hydraulic flow correctly.
If everything looks good, you are ready to start working at full capacity.
Final Tips for Trouble-Free Operation
- Recheck all bolts and hose fittings after the first 10–30 minutes of use.
- Periodically verify oil quality and filter condition.
- Keep the breaker chisel greased throughout operation.
- Avoid dry-firing the breaker against the air always work with a solid surface under the chisel.
Summary
Installing a Beilite hydraulic breaker is not difficult, but attention to detail is key. From ensuring clean oil to connecting hoses correctly and performing a safe slow-start, each step builds toward reliable and powerful performance in the field.
By following these instructions, you can extend the lifespan of your hydraulic breaker, protect your excavator’s hydraulic system, and ensure every job runs safely and efficiently.
If you maintain cleanliness, check pressure settings, and follow the correct installation process, your Beilite hydraulic breaker will deliver the strong, dependable performance it’s built for.
FAQs About Installing a Beilite Hydraulic Breaker
1. How do I know if my excavator’s hydraulic system is clean enough for a new breaker?
Check the oil color, clarity, and presence of particles. If the oil looks dirty, milky, or contains metal debris, replace or filter it. For first-time breaker installations, run circulating filtration through the hydraulic lines without connecting the breaker to flush contaminants out.
2. What happens if I connect the IN and OUT hoses incorrectly?
Reversing the inlet and outlet lines can cause immediate damage to the breaker, abnormal pressure buildup, overheating, and seal failure. Always verify that IN is connected to the pressure line and OUT to the return line before opening the stop valve.
3. Why must I release hydraulic pressure before installation?
Residual pressure can remain inside the excavator’s hydraulic system even after shutdown. If not released, disconnecting or installing hoses may cause sudden oil spray, hose whip, or personal injury. Releasing system pressure protects both equipment and operator safety.
4. How long should I test the breaker after installation?
A gradual “slow-start” test of a few minutes is recommended. Activate the breaker lightly while checking for oil leaks, abnormal vibration, incorrect hose routing, or deformation. Once confirmed stable, the breaker can be used at full power.
Beilite Machinery Co., Ltd.
40008-40008
info@beilite.com
+6282321982255