 English
 Indonesian

Hydraulic Breaker Auto-Lube Guide
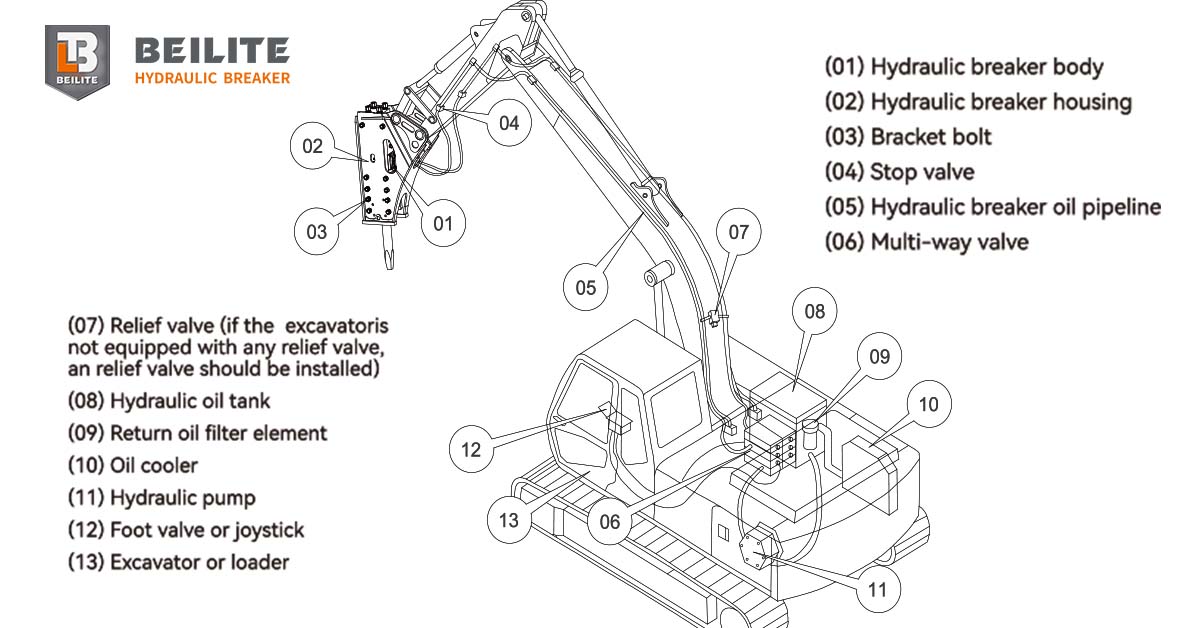
The modern hydraulic breakers or hammer rock breakers are engineered for high-impact performance, but that power generates immense friction. Regular, high-quality lubrication is non-negotiable for protecting the chisel and extending the service life of your machine. The most reliable way to ensure consistent grease application is through an Automatic Lubrication Device.
This guide provides operators and service technicians with the essential steps for proper installation, operation, and maintenance of the automatic lubrication system on your hydraulic breaker.
Essential Hydraulic Breaker Pre-Installation & Grease Selection
Before installing any device, two rules must be strictly followed to protect your hydraulic hammer breaker:
1. Grease Type: Do not use liquid grease. Always select the specific grade of grease recommended by Beilite or your manufacturer. Using the wrong consistency can damage the seals or fail to provide adequate lubrication.
2. Required Accessories: Note that the components required for automatic lubrication are optional and must be purchased separately (including the device, shield, bolts, pipe, and joint).
If you are new to the installation process, or if your breaker requires special attention, always consult Beilite or the designated agent before proceeding.
Step-by-Step Installation of the Automatic Lubrication Device
Proper installation ensures the system functions correctly and prevents debris from entering the grease pipeline.
Preparation: Hammer Breaker Cleanliness is the Principal Key
Clean the Cylinder: Use a tool to clear foreign materials at the grease hole of the cylinder. This prevents debris from immediately blocking the new system.
Clean the Housing: Thoroughly clean the mounting hole on the hydraulic breaker shell where the automatic lubrication device (①) will be attached.
Assembly and Mounting
Assemble the Unit: First, assemble the automatic lubricating device (①) and the shield (②).
Mount to Housing: Place the assembled unit onto the breaker housing, align it with the mounting hole, and secure it firmly using the inner hex socket bolt (③). Four bolts are typically required.
Connecting to the Cylinder
The core of the installation is linking the automatic device to the hydraulic breaker’s internal lubrication port.
Remove the Nipple: Use a T-socket wrench to carefully remove the standard grease nipple that is currently on the cylinder.
Install the Joint: Install the joint (⑤) at the cylinder’s grease hole. The standard thread specification is typically G1/4″.
Connect the Pipe: Connect the G1/4″ grease pipe (④) to the joint on the lubrication device and the newly installed joint on the cylinder.
Once these steps are complete, the automatic lubrication device is ready for initial operation and setting the proper grease cycle.
Hydraulic Rock Maintenance: Preventing Blockage and Failures
Even with a proper setup, the internal grease pipeline inside the hydraulic breaker is prone to hardening and blockage. This is often caused by:
Foreign Materials: Debris introduced during maintenance or operation.
Temperature Changes: Extreme cold or heat can cause the grease to solidify.
Hydraulic Rock Breaker Troubleshooting a Blocked System
If the grease cannot be added smoothly or if the automatic device fails to deliver lubrication, immediate intervention is required to prevent damage to the chisel and bushings:
Disassembly: The system must be disassembled.
Removal: Remove the foreign materials and deposited grease that have hardened in the internal pipeline.
Cleaning: Clean the entire pipeline thoroughly before reassembling and re-testing the system.
Regular checks of the grease pipe (④) and the flow are essential for ensuring the system is delivering the necessary protection to the hydraulic breaker.
Composition of the Automatic Lubrication System (BLTB Models)
For reference, the system for common models (like BLTB125, BLTB135, BLTB140, etc.) consists of the following components:
| Component | Description | Quantity | Component |
| Automatic Lubrication Device (①) | The pump and reservoir unit. | 1 | Automatic Lubrication Device (①) |
| Shield (②) | Protects the device from impact. | 1 | Shield (②) |
| Inner Hex Socket Bolt (③) | Used for securing the shield and device. | 4 | Inner Hex Socket Bolt (③) |
| Grease Pipe (④) | Connects the pump to the cylinder joint. | 1 | Grease Pipe (④) |
| Joint (⑤) | Connects the pipe to the cylinder grease hole. | 1 | Joint (⑤) |
By following this complete guide, operators can ensure the correct function of their automatic lubrication device, maximizing the uptime and service life of their heavy equipment.
Frequently Asked Questions (FAQs)
1. What type of grease is required for the hydraulic breaker’s automatic lubrication device?
You must never use liquid grease in the automatic lubrication device. Only use the specific grade of grease recommended by Beilite or your manufacturer. Using the wrong consistency can cause damage to seals, fail to provide adequate lubrication, and lead to blockages in the grease pipeline.
2. What are the key steps for connecting the automatic lubrication device to the breaker cylinder?
The connection requires three main steps:
a. Remove: Take off the standard grease nipple on the cylinder.
b. Install: Screw the specialized G1/4″ joint (⑤) into the cylinder’s grease hole.
c. Connect: Link the grease pipe (④) between the automatic device and the new joint on the cylinder. Always ensure the mounting hole and grease hole are cleaned of foreign materials first.
3. What should I do if the grease is not flowing smoothly from the automatic lubrication system?
If the grease cannot be added smoothly (due to hardening or foreign materials), the system is likely blocked. You must:
a. Disassemble the hydraulic breaker components to access the internal pipelines.
b. Remove any foreign materials and deposited grease.
c. Clean the entire internal pipeline thoroughly before reassembling the automatic lubrication device and resuming operation.
Beilite Machinery Co., Ltd.
40008-40008
info@beilite.com
+6282321982255