 English
 Indonesian
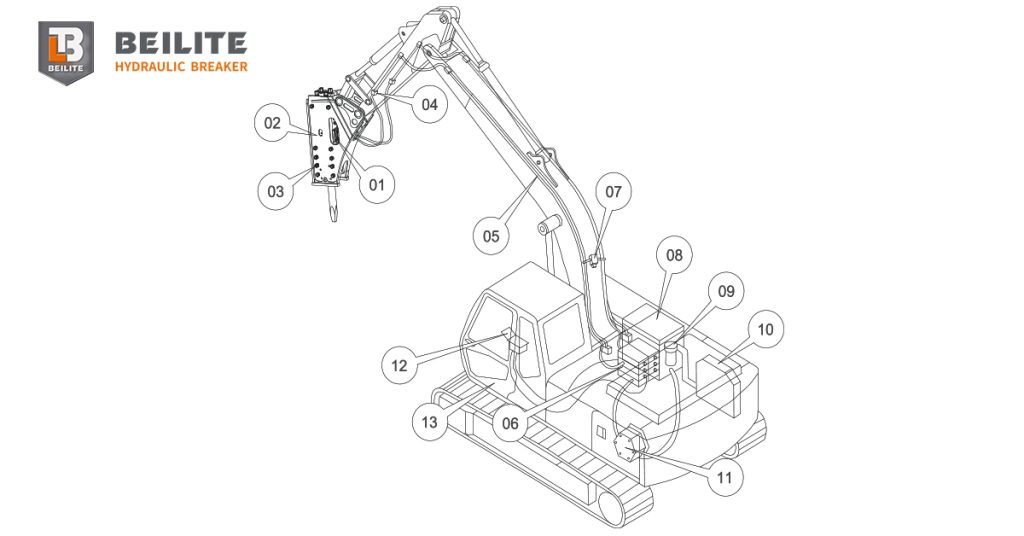
Proper installation of a hydraulic breaker is essential for ensuring smooth operation in construction, demolition, mining, and quarrying projects. Before beginning installation, engineers, technicians, and operators must fully understand the characteristics of both the carrier, whether an excavator, backhoe, or loader, and the hydraulic breaker itself. Carrier weight class, hydraulic system capacity, and breaker tonnage must be matched correctly to deliver optimal impact power, prevent damage, and extend equipment life periods.
13 Key Components Technicians Must Understand Before Installing a Hydraulic Breaker
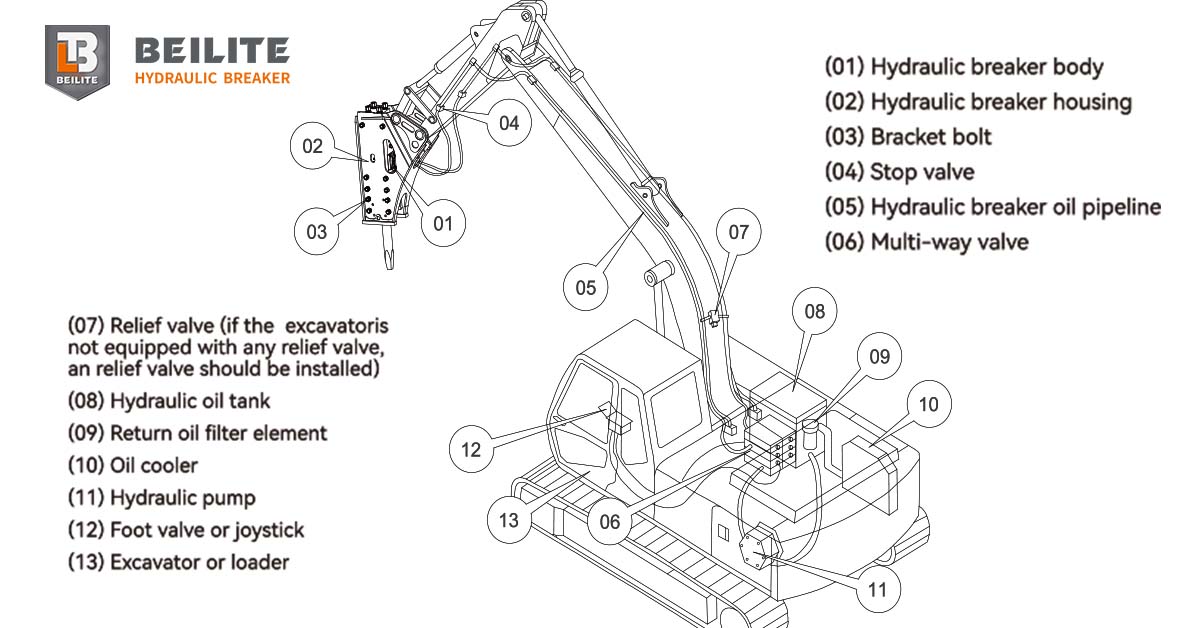
A successful installation requires familiarity with all major hydraulic breaker and carrier components, including:
Hydraulic breaker body – the structural mainframe supporting the internal mechanism.
Hydraulic breaker housing – protective casing that absorbs vibration and shields internal parts.
Breaker bolts – high-strength fasteners requiring correct torque to prevent loosening.
Stop valves – control oil flow and safeguard the hydraulic circuit.
Hydraulic breaker oil pipeline – dedicated lines supplying pressure oil and return oil.
Multi-way valve – controls hydraulic flow distribution within the carrier.
Relief valve – essential for regulating maximum pressure; must be installed if the carrier lacks one.
Hydraulic oil tank – stores and circulates hydraulic fluid.
Return oil filter element – removes contaminants to protect the breaker and pump.
Oil cooler – maintains acceptable operating temperature during heavy duty work.
Hydraulic pump – the power source driving hydraulic flow.
Foot valve or joystick – operator control mechanism for breaker activation.
Excavator or loader – the carrier that must meet weight and hydraulic compatibility requirements.
Understanding these components help prevent installation errors that could lead to poor performance, overheating, or mechanical failure.
Connecting Hydraulic Pipelines for Hydraulic Breakers
To ensure proper breaker operation, technicians must correctly connect the hydraulic pipes between the breaker and the carrier (excavator, loader, or backhoe). The connection layout varies by brand and carrier model, so technicians must follow the manufacturer’s hydraulic diagram.
Key Requirements for Hydraulic Breaker’s Pipeline Connection
Use a dedicated hydraulic circuit:
The hydraulic breaker must operate on an independent circuit. Sharing hydraulic lines with other functions is strictly prohibited, as this can cause pressure drop, overheating, and irregular movement.
Verify hydraulic system specifications:
Pressure settings, flow rate, and pump performance differ among carriers. These must be inspected and confirmed before installation.
Correct installation of critical components:
The following parts must be mounted properly and calibrated to ensure safe and efficient operation:
- Relief valve
- Stop valve
- Oil inlet and outlet lines
- Pilot valve
- Foot pedal or joystick control
- Pilot pump
- Main pump
- Main control valve
- Hydraulic breaker
Any mismatch or incorrect installation may lead to insufficient impact power, excessive heat, or serious hydraulic damage.
Preparation Before Installing a Hydraulic Breaker
This section ensures safe and accurate installation while maximizing breaker lifespan and performance. Before mounting the breaker, technicians must verify the following:
✔ Compatibility with Excavator or Loader
Ensure the breaker model is compatible with the carrier’s hydraulic flow, pressure range, and mounting system.
✔ Carrier Weight Matching
Confirm the carrier weight is suitable for the breaker class. Over-sized or under-sized combinations will reduce efficiency and may damage the equipment.
✔ Installation Confirmation
Double-check hydraulic connections, torque for mounting bolts, lubrication of bushings, and correct hose routing to prevent twisting or stretching.
✔ Performance Matching
Verify that the carrier’s hydraulic system delivers the required flow (L/min) and pressure (bar) to achieve the breaker’s rated impact energy.
Hydraulic Breaker Compatibility Installation
Proper compatibility between the excavator and hydraulic breaker is essential for stable performance. If the excavator’s hydraulic pressure or flow is lower than the breaker’s requirements, the breaker may exhibit reduced impact frequency or fail to start. Conversely, excessive flow or pressure can cause overheating and serious damage. Aging hydraulic pumps and rising oil temperature can also reduce oil flow, leading to performance failure.
All hydraulic pipelines must match the breaker’s specified pressure, flow, and diameter. Undersized pipes increase back pressure, cause irregular operation, and generate excessive heat; therefore, the oil outlet pipe should be larger than the inlet. The excavator must also have sufficient loading capacity, including when using a quick coupler.
Hydraulic oil selection and temperature control are critical. Using non-standard hydraulic oil shortens seal life, while inappropriate viscosity, either too high or too low, affects breaker performance and may damage components. Operators should ensure the excavator’s cooling system is adequate and maintain oil temperature between 50 – 70°C; temperatures above 80°C can lead to oxidation, loss of lubrication, seal failure, and severe hydraulic damage. Oil levels should always be checked after installation or maintenance.
For installation requirements, hydraulic specifications, and correct oil selection, operators should consult the excavator manufacturer or Beilite for expert guidance.
Hydraulic Oil Discharge and Pipelines Cleaning
Keeping hydraulic oil clean is essential to prevent damage between the breaker cylinder and piston. Before installing a hydraulic breaker, the hydraulic oil must be fully discharged and the pipelines thoroughly cleaned to remove contaminants.
Hydraulic Oil Discharge:
Use a clean 20L drum, lower the excavator arm, activate the breaker switch 3–5 times with stop valves closed, then open the valves and drain the oil into the drum (without operating the breaker). Repeat the process at least three times.
Pipeline Cleaning:
Connect the inlet and outlet hoses directly (bypassing the breaker), run the engine at maximum speed, and cycle the breaker switch for 5 minutes. Tap the pipelines with a rubber hammer to loosen debris. After circulation, replace the hydraulic oil and filter. Repeat the cleaning process at least three times.
Procedures Safe Installation and Uninstallation, & mount cap installation
Safe installation and uninstallation of a hydraulic breaker require strict protective measures to prevent injuries from flying metal debris, sudden arm movement, or hot hydraulic oil. Operators must wear safety gear, work on clean and level ground, and release hydraulic pressure before disconnecting hoses. When multiple people are involved, coordinated communication is essential.
For mount cap installation (top-type and box-type breakers), the breaker should be placed securely on a wooden block with pipe joints facing upward. The mount cap is then fastened to the breaker housing using bolts, washers, and lock nuts. Box-type breakers also require inserting a back buffer before tightening the assembly. Proper mounting ensures safe and stable attachment to the excavator or loader.
Connecting the Hydraulic Breaker to the Excavator or Loader
To connect the hydraulic breaker to the excavator or loader, place the breaker on clean, hard ground with the chisel facing the carrier. Insert the pin sleeves into the breaker’s pin holes, then maneuver the excavator so the small arm’s pin holes align with those on the breaker housing. Once aligned, insert the connecting pin, secure it with the retainer ring, and tighten the bolts and lock nuts. This ensures a stable and safe attachment between the breaker and the machine.
To connect the hydraulic breaker to the excavator or loader’s connecting rod, first raise the breaker to the proper height. Insert pin sleeves into the breaker’s pin holes, then align these holes with those on the connecting rod by passing through the bucket cylinder. Once aligned, insert the connecting pin, secure it with the retainer ring, and tighten all bolts and lock nuts. Finally, operate the machine to check for any stiffness, looseness, or mechanical issues, ensuring a safe and stable connection.
Hydraulic Oil Pipe Connection Procedure
Before connecting the hydraulic pipeline, ensure the excavator’s hydraulic system is clean to prevent damage to the breaker. Check for oil contamination, replace or filter hydraulic oil if needed, and renew the return filter element according to maintenance requirements. For first-time use, clean the pipeline through circulating filtration without connecting it to the breaker. Verify that the breaker’s relief valve pressure is set 30 – 40 bar above its working pressure.
Always release system pressure fully before installation or maintenance. Ensure sealing surfaces, oil pipes, and connecting threads are clean and undamaged.
During connection, confirm the stop valve is closed. Remove the adapter covers on the breaker and attach the inlet (IN) and outlet (OUT) pipes correctly. Connect the pipes to the stop valve without reversing inlet and outlet, ensuring the pipes remain smooth and untwisted. After proper connection, open the stop valve, note that the breaker may activate suddenly, then operate the breaker slowly to check for leaks or pipe deformation.
Release system pressure again when working on the system, and maintain cleanliness of all sealing and connection areas.
Beilite Machinery Co., Ltd.
40008-40008
info@beilite.com
+6282321982255